


Running your e-commerce store on WooCommerce and feeling limited by plugins, slow load e-commerce store speeds, or constant updates?
You are not alone.
Thousands of e-commerce store owners are making the switch and choosing to migrate WooCommerce to Shopify for a simpler, faster, and more scalable solution.
Shopify offers a complete eCommerce ecosystem, no server management, no plugin chaos, just smooth selling. From lightning-fast hosting to powerful integrations and a user-friendly admin dashboard, the WooCommerce to Shopify migration trend is booming for a reason.
Whether you are tired of technical maintenance or aiming to grow globally, migrating from WooCommerce to Shopify opens up a world of possibilities:
In this guide, I will guide you on how to migrate from WooCommerce to Shopify, step by step. You will learn how to move your product catalog, customer data, and order history without downtime, while preserving SEO and user experience.
Let’s future-proof your online e-commerce business with Shopify.
Before migrating from WooCommerce to Shopify, it is important to lay a solid foundation. These pre-migration steps will help you avoid errors, data loss, and SEO issues during the WooCommerce to Shopify transition.
1. Backup Your WooCommerce Store: You can use plugins like UpdraftPlus or your hosting control panel to create a full backup (including database and files).
2. Audit Design, Features, and SEO: Create a list of all essential elements, including must-have pages (e.g., homepage, product details, blog), active plugins (such as SEO, payment, and shipping), and your current URL structure to ensure a smooth migration.
3. Note Down 3rd-Party Tools: List integrations like Mailchimp, payment gateways, shipping tools. This helps identify Shopify alternatives.
4. Inform Customers (Optional): Let your customers know there may be changes, and they will get an even better shopping experience.
Don’t have a Shopify store yet? Learn how to begin with our guide: Starting Your First Shopify Store.
To start your WooCommerce to Shopify migration, you first need a functional Shopify store ready to receive your data.
This step involves setting up the basic e-commerce store structure, selecting a Shopify theme, and configuring core settings.
1. Sign Up for Shopify: Go to shopify.com and start a 3-day free trial (or paid plan if you are ready).
Before choosing a plan, you can explore our Shopify basic pricing guide for 2026 to understand the monthly costs and features.
2. Choose Your Store Name & Industry: During onboarding, enter your business name, country, and industry type.
3. Pick a Theme: Go to Online Store → Themes
You can browse free or paid themes.
Tip: You can use 10+ Shopify Horizon free Themes For Your Shopify Store.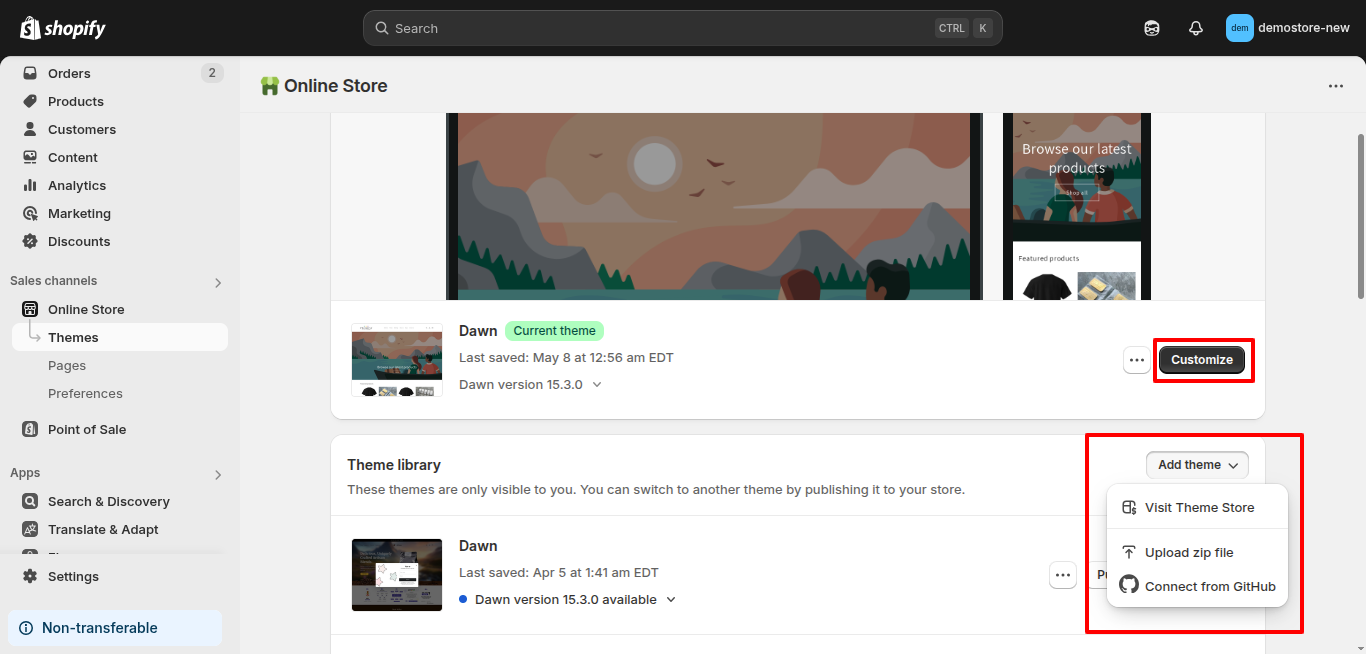
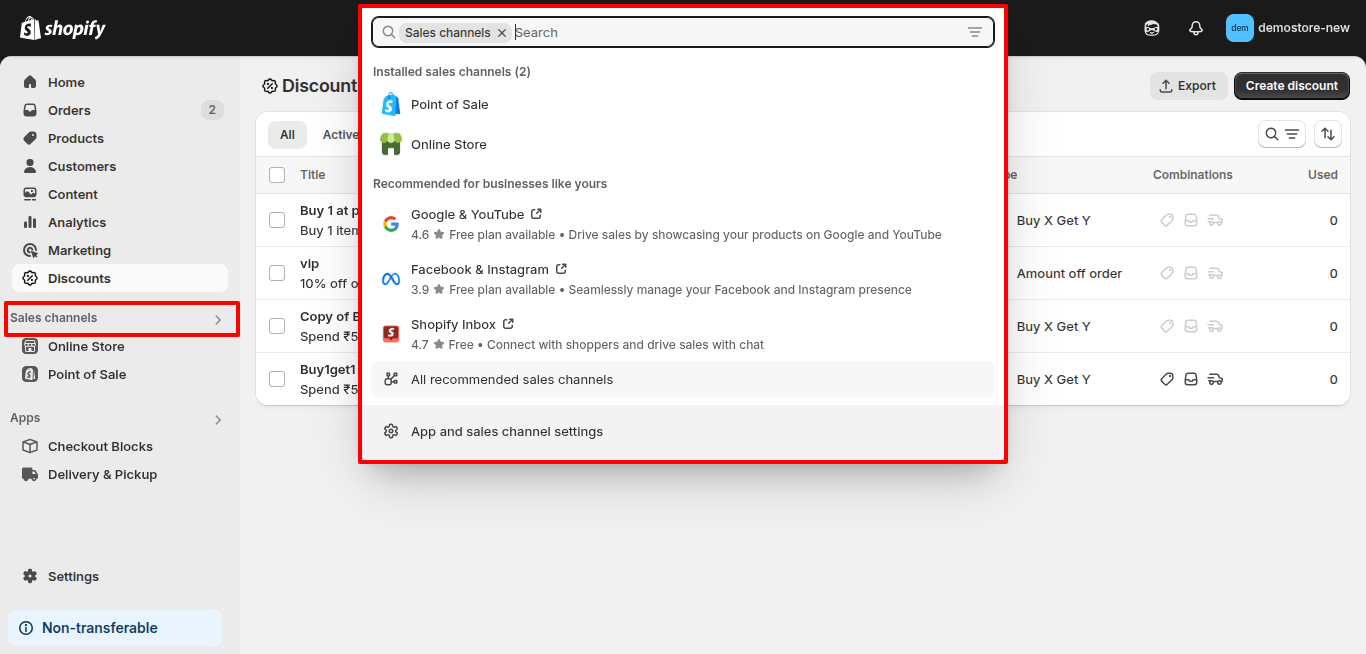
4. Set Store Preferences:
5. Set Up Currencies & Taxes
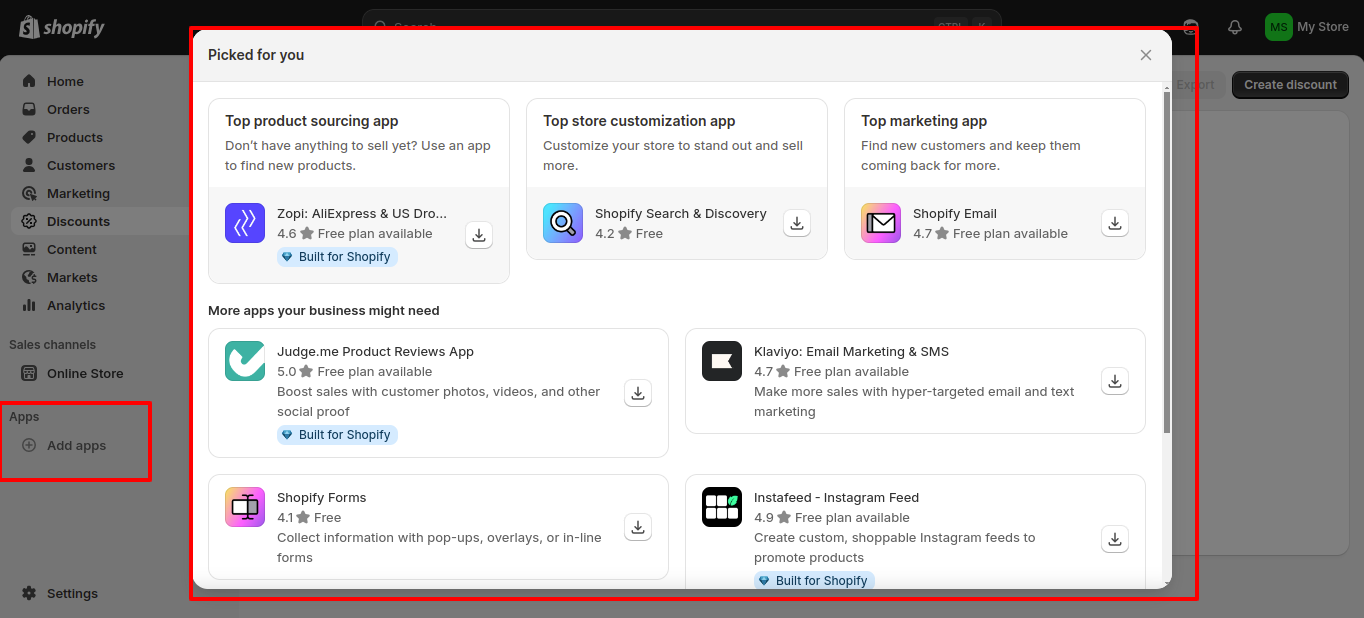
6. Install Best Shopify Apps:
If you want to build a Shopify store from scratch, then our step-by-step guide for beginners will help you build a new Shopify store.
Exporting your WooCommerce data is essential before you migrate & import to Shopify. Whether you are planning to migrate products from Shopify to WooCommerce in the future or doing a one-way switch, having clean export files ensures a smoother transfer.
1. Log in to your WordPress Admin
2. Go to WooCommerce → Products → Export
3. Select:
4. Repeat the same for Orders and Customers
5. For full control, use:
This helps you migrate products from WooCommerce to Shopify with images and metadata intact.
Once your WooCommerce data is exported, you are ready to move it into Shopify. Even if you later decide to migrate data from Shopify to WooCommerce, having well-structured files will simplify future transfers.
These allow importing:
After importing, it is important to clean and organize your product catalog for easy browsing. This step ensures the migrated products from WooCommerce to Shopify are correctly categorized, tagged, and displayed.
1. Go to Products in Shopify Admin
2. You need to review:
3. Go to Collections to group products (manual or automated)
Example: Create a “New Arrivals” collection to showcase recently added products.
4. Use Product Tags to make filtering easier in your Shopify store
Now that your products are in place, it’s time to shape the look and feel of your new Shopify store.
Customize your Shopify theme to match your brand identity and create a smooth shopping experience for your customers.
1. Go to Online Store → Themes
2. Click Customize on your active theme
3. Edit homepage blocks:
4. Set Navigation:
5. Add Important Pages:
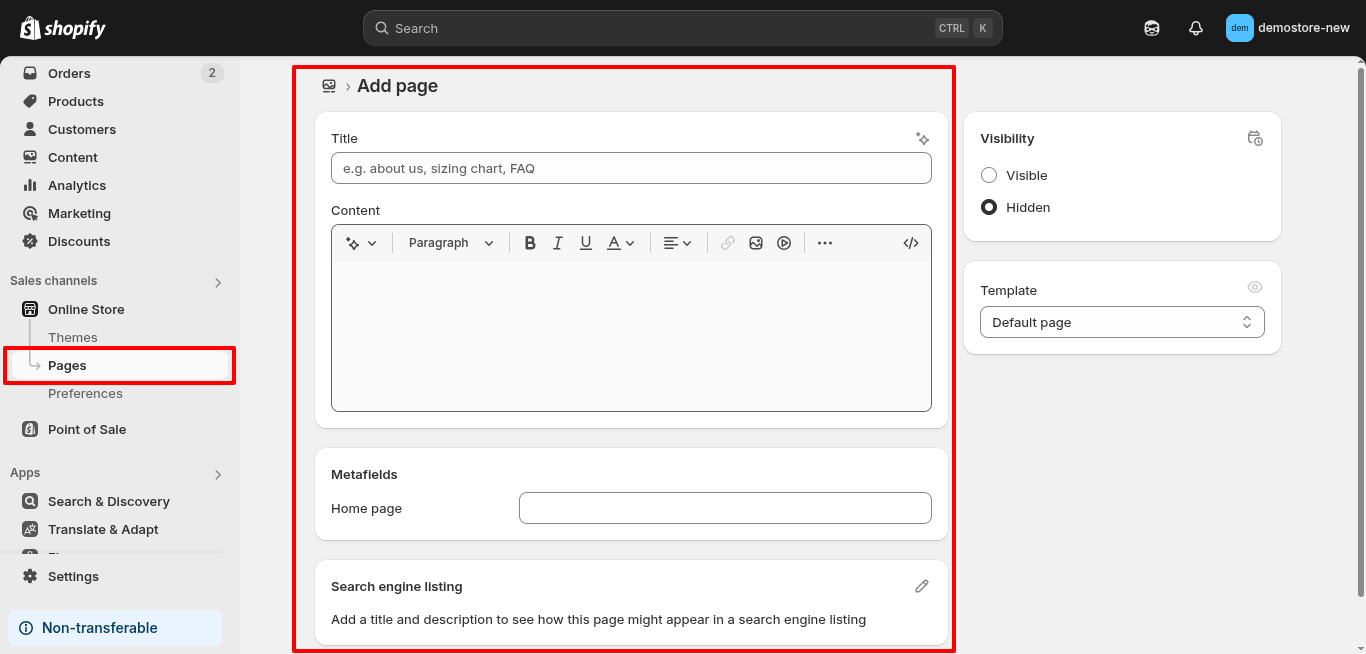
6. Customize Branding:
Use mobile view (in editor) to ensure your design looks good on all devices.
With your e-commerce store designed, the next step is to make it transaction-ready. Setting up payments, shipping zones, and tax rules ensures customers can shop and check out smoothly on your new Shopify store.
A) Set Up Payments
Go to Settings → Payments
Choose from:
Enter your bank details to receive payouts.
You can also use the best Buy Now Pay Later Shopify apps in your Shopify store.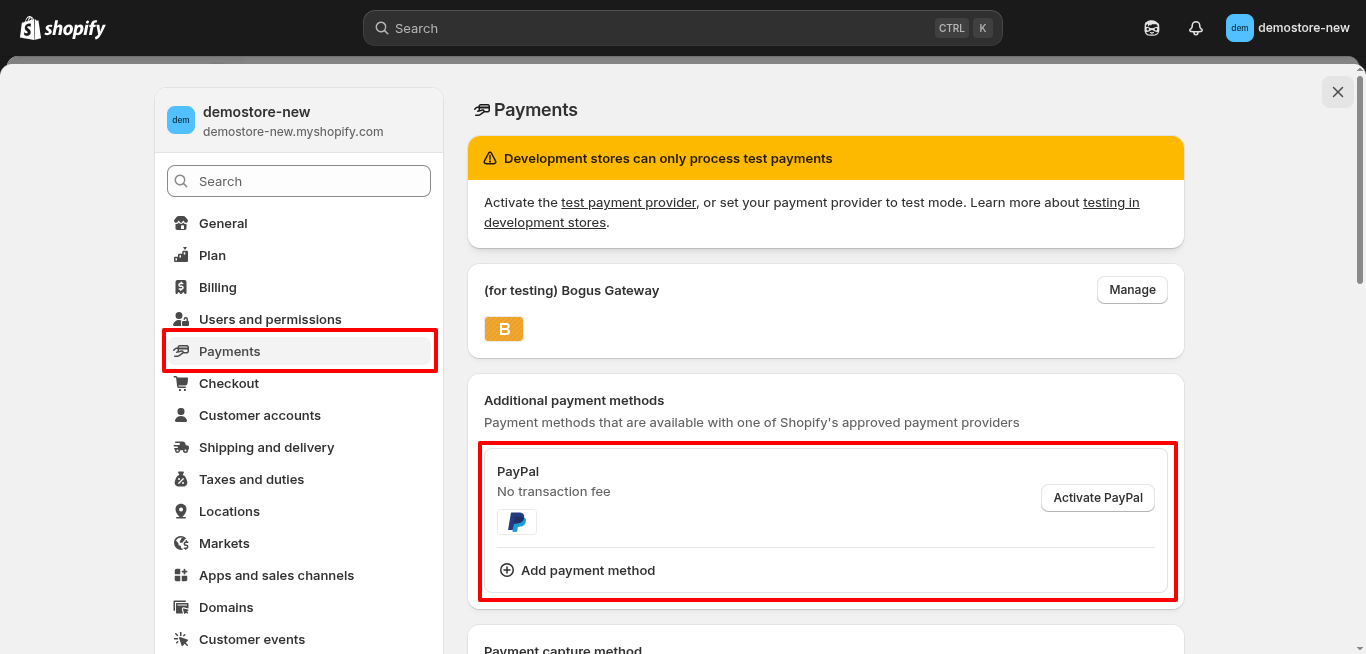
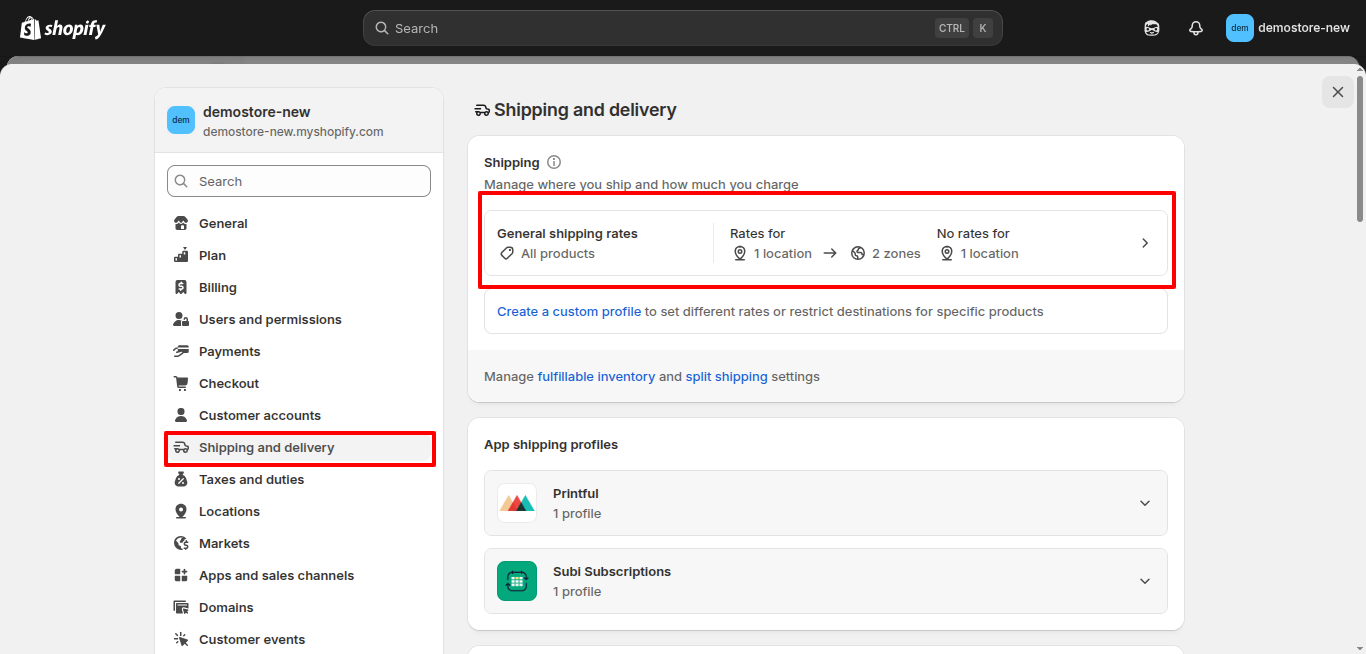
B) Set Up Shipping
Go to Settings → Shipping and Delivery
Create Shipping Zones:
Set Rates:
C) Set Up Taxes
Go to Settings → Taxes
Enable automatic tax calculation if available for your country
Add GST info (for Indian sellers) if applicable
A WooCommerce-to-Shopify migration can quietly undo years of SEO progress if redirects and metadata aren’t handled correctly. Search engines and customers both rely on consistent URLs, so this step is about preserving the rankings you’ve already earned, not just moving content over.
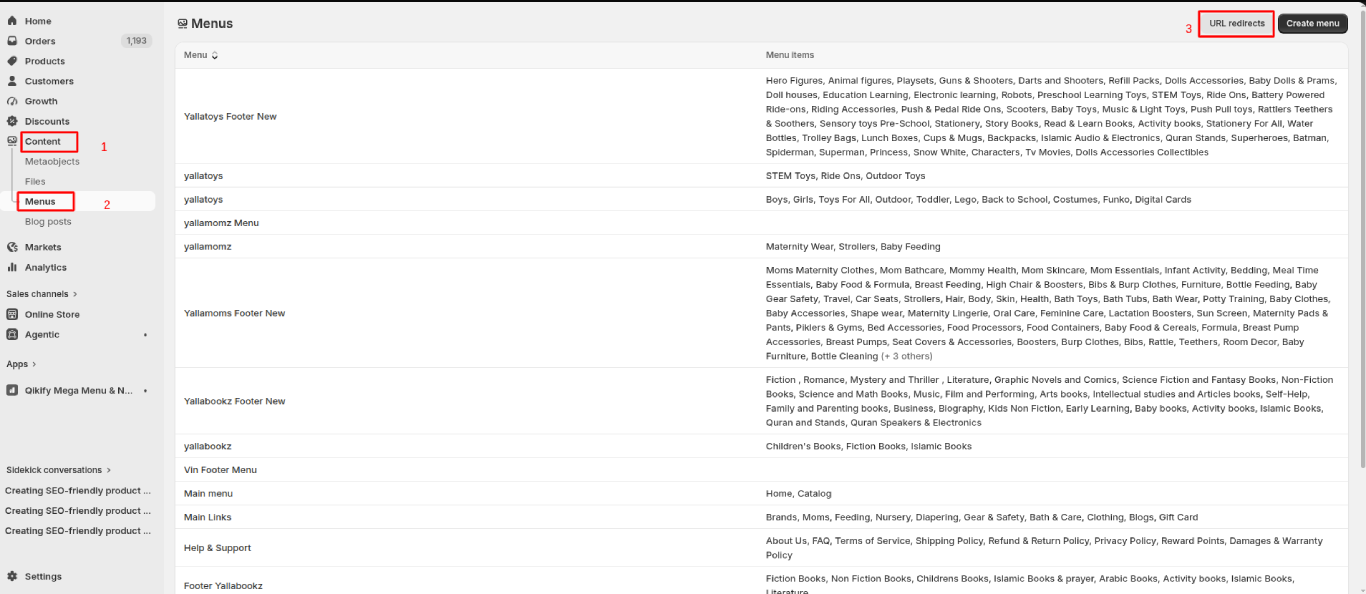
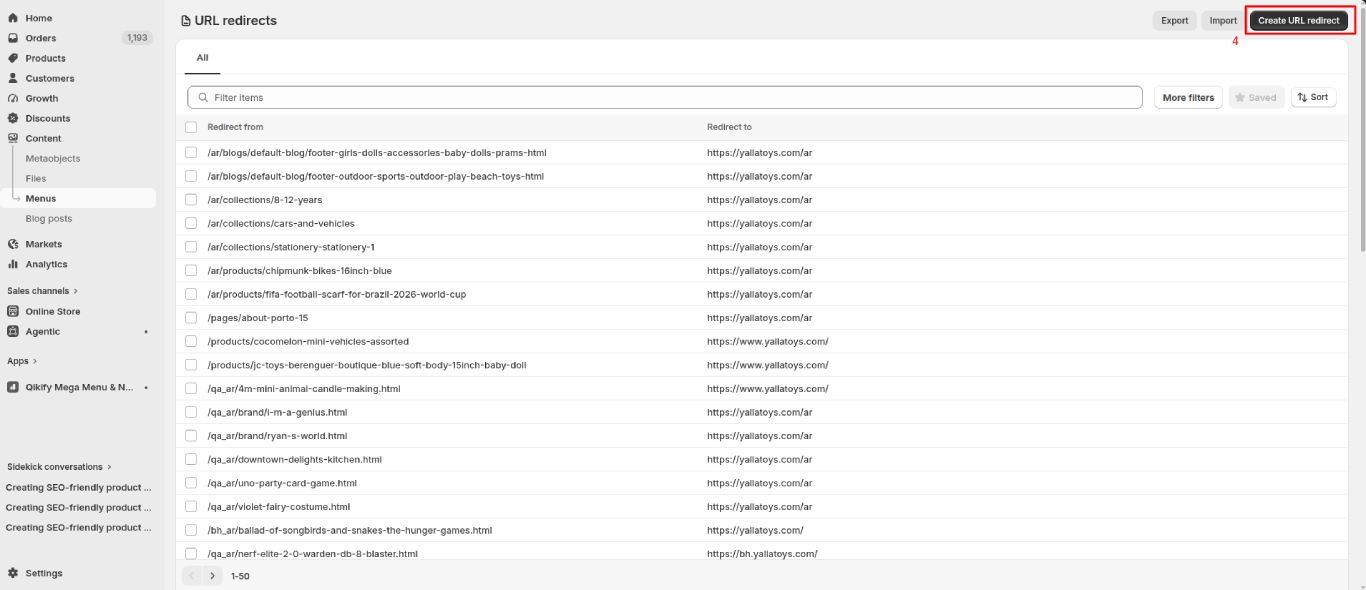
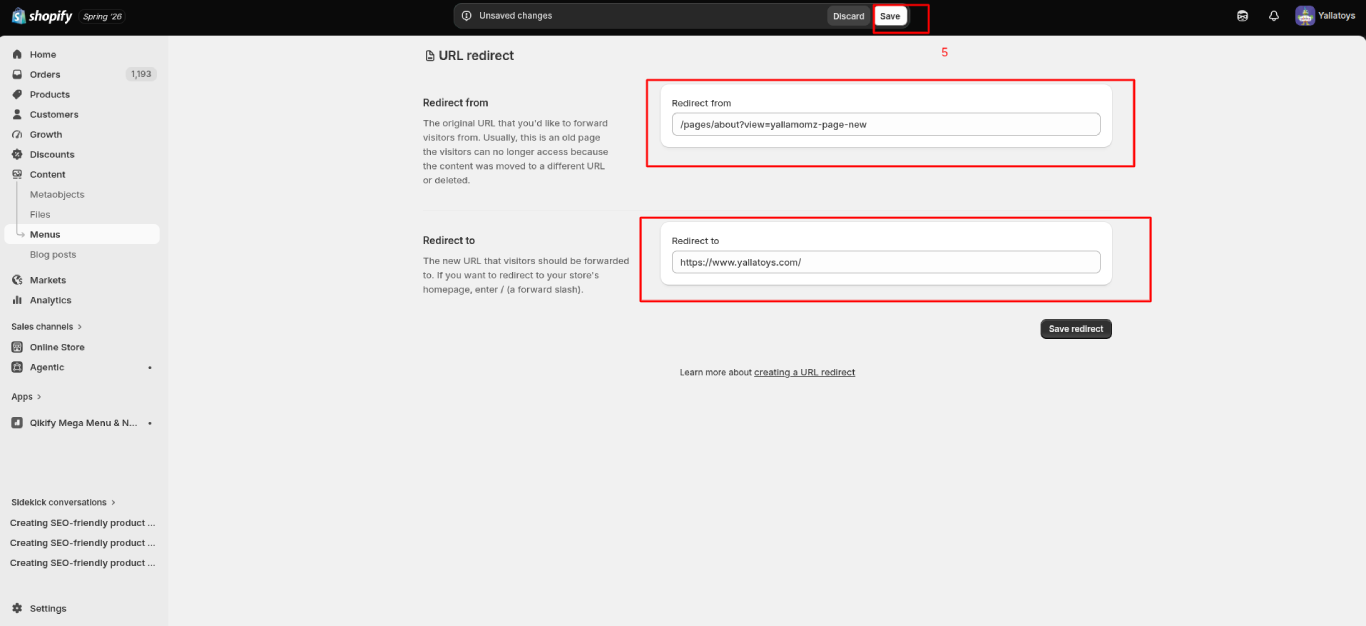
1. Redirect every old WooCommerce URL to its new Shopify equivalent
Go to Online Store → Navigation → URL Redirects and map each old product, collection, and blog URL to its new Shopify address. Skipping this step sends both Google and returning customers to 404 pages, which can tank your rankings within days.
2. Recreate your essential pages
Migrations often lose pages that don’t live in the product catalog, so make sure these exist on your new Shopify store before launch:
Once recreated, redirect the old WooCommerce versions (e.g. /about-us, /privacy-policy) to their new Shopify URLs the same way you did for products and collections. These pages often carry backlinks and indexed traffic too, so leaving them as 404s is a common and avoidable SEO loss.
3. Audit your blog content and internal links
Go through every blog post and update internal links that point to old WooCommerce URLs, especially links to products, collections, and the pages you just recreated in Step 2. Internal links are easy to overlook during a migration, but broken ones quietly create 404 pages across your own content and waste the link equity you’ve already built. A quick way to catch these: crawl your site with a tool like Screaming Frog or Ahrefs Site Audit, filter for 404s, and fix each one at the source rather than relying on redirects alone.
4. Re-optimize your on-page SEO elements
Migration is also a good checkpoint to clean up:
Don’t just copy these over verbatim; Shopify’s URL structure and character limits differ slightly from WooCommerce, so it’s worth a quick pass to make sure nothing is truncated or duplicated.
5. Submit your new sitemap to Google
Head to Google Search Console and submit yourstore.com/sitemap.xml so Google can start indexing your new Shopify store right away.
6. Automate ongoing SEO maintenance
Once the migration basics are covered, install a tool like Avada SEO or Smart SEO to handle the day-to-day work: broken link detection, image compression, and schema markup, so your SEO doesn’t fall behind after launch.
Before going live, thoroughly test every part of your Shopify store, from product pages to checkout flow, to catch any issues early.
This ensures a smooth user experience after your WooCommerce migration to Shopify.
So, test:
Note: Passwords don’t migrate. Ask customers to reset passwords via Shopify email post-launch.
As you connect your domain, ensure all settings are properly configured to avoid downtime. When migrating a domain and SEO from WooCommerce to Shopify, double-check redirects and metadata to preserve your site’s search visibility.
1. Go to Settings → Domains → Connect Existing Domain
2. Update DNS settings in your domain registrar (e.g., GoDaddy, Namecheap)
3. Wait for propagation (up to 24 hours)
4. Hit Publish on your Shopify store
Tip: Announce your launch via email newsletter, popups, and social media.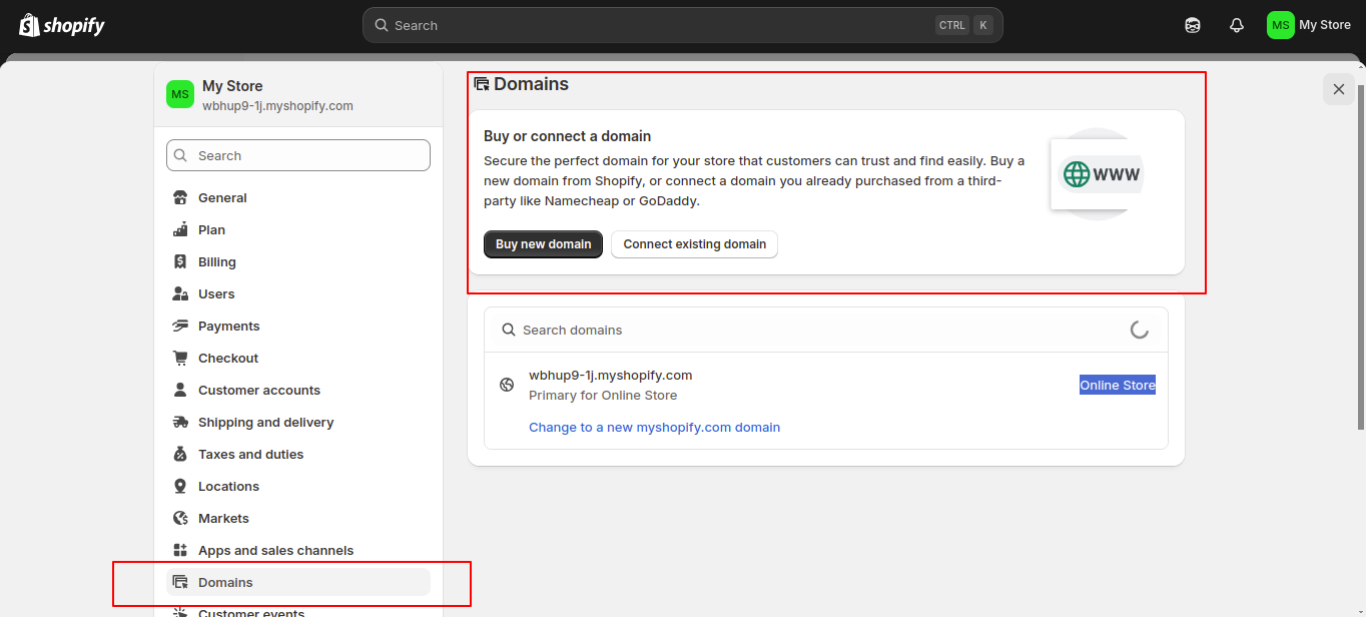
Methods to Migrate WooCommerce Store to Shopify
| Method | Description | Tools/Resources | Estimated Duration |
| Manual Migration | Export and import CSV files manually for products, customers, and orders. | WooCommerce CSV Export, Shopify Import Tool | 2–3 days |
| Automated Tools | Use migration apps to automate data transfer, including redirects and images. | Cart2Cart, Matrixify, LitExtension | 1–2 days |
| Hire Shopify Experts | Professional service handles everything from setup to testing and SEO mapping. | ControlF5, Best WooCommerce to Shopify migration agency | 4–7 days (depends on scope) |
If you are confused between Shopify vs WooCommerce: Which Platform is Right for Your Business? Then you must check out our blog to know more.
Here are three brands we helped transition from WooCommerce to Shopify, with noticeable gains in speed, sales, and design.
1. Aayraa Jewels – Built from the Ground Up
We developed a custom Shopify store for Aayraa Jewels with a modern, mobile-friendly design and an intuitive shopping experience. Their new store reflects their luxury brand and is built to scale.
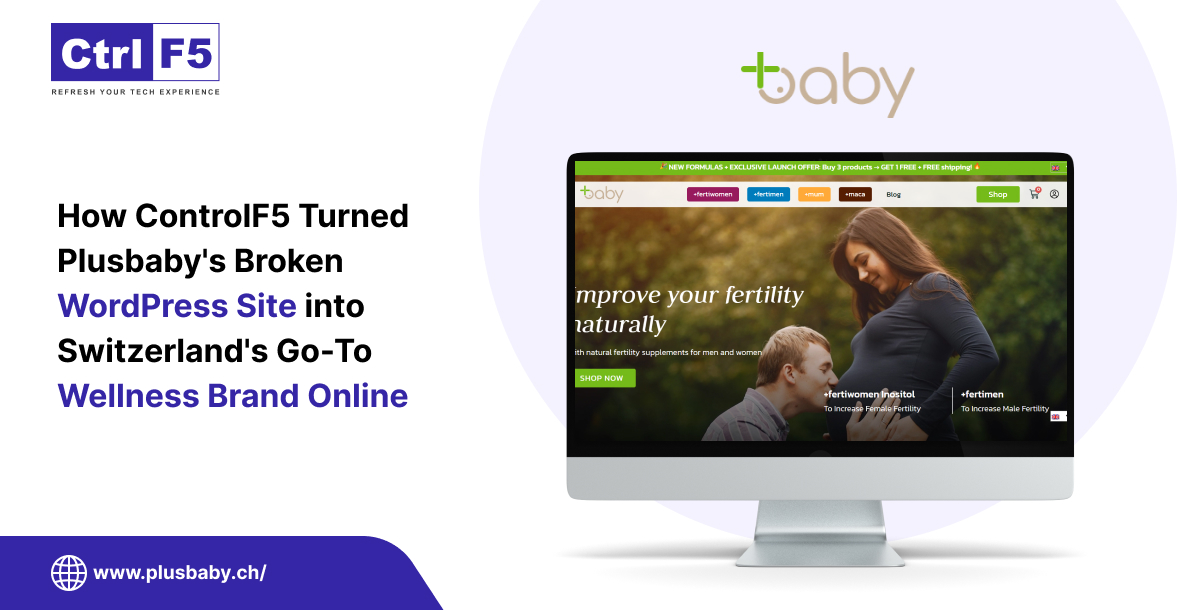
2. The Alpine Apothecary – Migration & Redesign
We migrated their entire store from WooCommerce to Shopify, revamped the design, and improved overall website speed and user experience, helping them serve their wellness community more effectively.
3. WooCommerce to Shopify for Better Sales
We supported a brand facing slow performance and backend challenges on WooCommerce. After migrating to Shopify, they experienced smoother management, better SEO, and increased conversions.
Migrating your online e-commerce store doesn’t have to be challenging. At ControlF5, we offer end-to-end Shopify migration services based on your business goals. From securely transferring products, orders, and customer data to maintaining your SEO structure and domain authority, our team ensures a smooth and efficient transition.
We also redesign and restructure your store for Shopify’s ecosystem while integrating the best Shopify apps to boost performance and conversions.
If you are heading the other way, we also provide Shopify to WooCommerce migration support. Whether it’s migrating customer data, syncing order history, or preserving website functionality, ControlF5 has successfully handled it all.
Talk to ControlF5 – the best WooCommerce to Shopify migration agency trusted by 4000+ global e-commerce store brands.
Question: Can I migrate from WooCommerce to Shopify?
Answer: Yes, you can migrate from WooCommerce to Shopify using Shopify’s native importer or third-party tools like Cart2Cart and Litextension. These solutions allow you to move products, orders, and customer data efficiently with minimal disruption.
Question: Is it worth moving from WooCommerce to Shopify?
Answer: Absolutely. Shopify offers a more scalable, secure, and low-maintenance platform that helps businesses grow faster. It eliminates the hassle of frequent plugin updates and server management common with WooCommerce.
Question: Can I transfer my existing website to Shopify?
Answer: While the exact website design may need to be rebuilt, you can easily transfer all your store data, like products, collections, content, and customer information, into Shopify using available tools.
Question: Why migrate to Shopify?
Answer: Shopify provides a hosted environment with high performance, excellent security, and an intuitive admin panel. It also supports a wide app ecosystem and advanced Shopify features without the need for coding knowledge.
Question: Which eCommerce platform is best?
Answer: Shopify is the best choice for businesses seeking ease of use, reliability, and fast growth potential. WooCommerce is more suited for those who need deep customization and are comfortable handling technical setups. If you want to explore more options before deciding, you can check out this complete list of eCommerce website builders in 2026 to compare different platforms based on your business needs.
Question: Will I lose data while migrating?
Answer: No, as long as you use reliable migration tools and create a full backup of your WooCommerce store. You can consider hiring the best WooCommerce to Shopify migration company to migrate successfully without data loss.


This guide will show you exactly what agentic ecommerce is, how AI platforms like ChatGPT, Google AI Mode, and Perplexity decide which products to recommend — and what you need to do so your Shopify store shows up in those conversations.
Jewellery shoppers judge a brand by its presentation first. A clean, premium Shopify store can instantly build trust, highlight craftsmanship, and improve conversions across mobile and desktop.
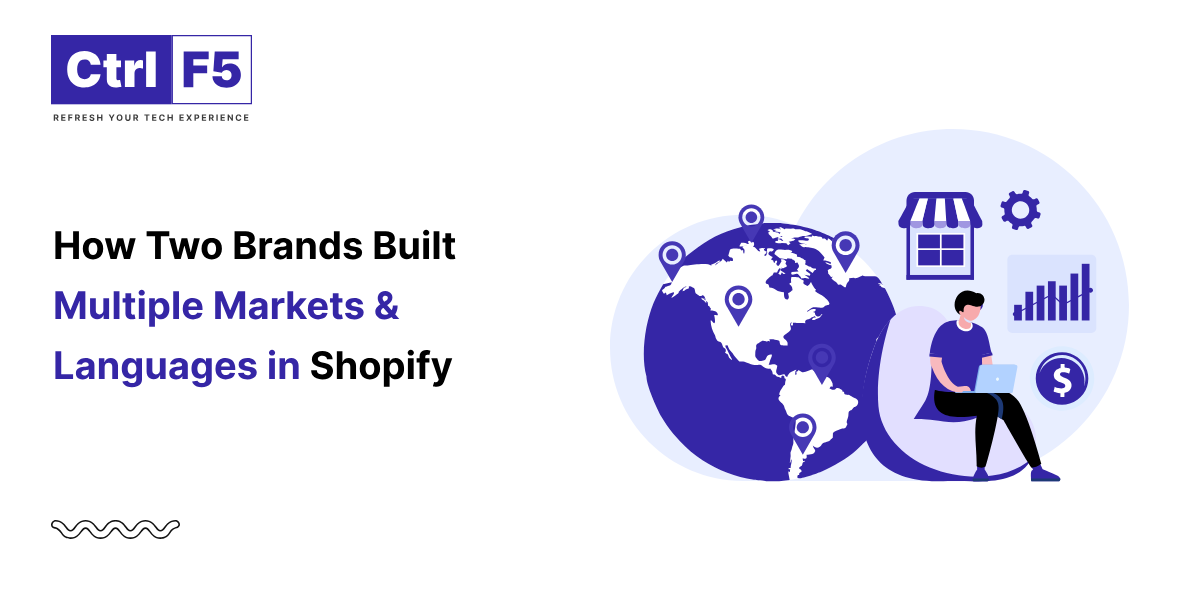
SHOPIFY MARKETS Multi-Market & Multi-LanguageCase Study Collection Dubai • Qatar • Bahrain • United Kingdom Made With Manners · Yalla Toyshow two brands build multiple